

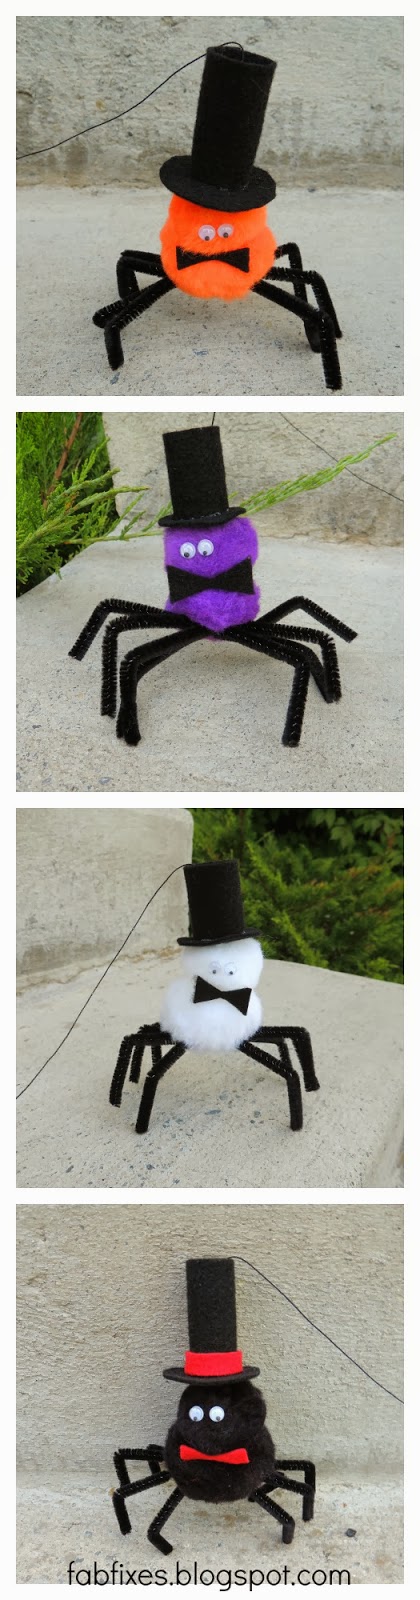
Here are all the supplies needed for this project (and I appologize for the googly eyes not being in the original picture - I forgot). So you need: 2 googly eyes, 2 black pipe cleaners, 1 large pom pom and 1 medium pom pom (preferably the same color), black thread (I used embroidery thread so it would be strong), needle, tacky glue, scissors, black felt and red felt (the red is optional).
Also, if you look at the picture below really closely you can tell that when I made the purple one I used 2 medium pom poms and that worked too. I think it just looks best if you can have a larger one for the body. You can also see that I used the red felt only on the black spider. I could have used it on the others but I thought they wouldn't look as Halloweenish and it would have really clashed on the orange spider. So as you can see there's lots of room for creativity here! :)
 |
| Adorable Hanging Halloween Spider Decoration - DIY |
And here we go with the tutorial:
1. Cut the pipe cleaners in half so you have 4 pieces that are all the same size.
2. Cut a piece of thread that is about 2 feet long. Thread the needle and sew straight through the large pom pom so you have a thread with a pom pom floating in the middle of it. Flip the needle around and sew along the same line directly back through so both ends of the thread are coming out of the same side on the pom pom (follow the white dashed line below). Pull the thread so you have one end that has about 2 inches sticking out of the pom pom - the other end with the needle on it should be sticking out of the same place but should be a lot longer.

3. What you're going to do now is tie those two ends together. As you are doing this slip the 4 pipe cleaner halves into the knot where the yellow arrow is pointing. Tie it a couple times so it's nice and tight. It should look like the pictures below.
4. If you look at the pictures below you can see that I took the thread and sewed it around the pipe cleaners and into the pom pom a couple of times to make sure it's sturdy. When you think it's good, poke the needle all the way through the pom pom again so that it comes out the opposite end of where the "legs" are.

5. So if you can tell by looking at the picture below, the legs are on the bottom, the pom pom on the top, and the thread is coming out of the top with the needle still attached. Next thing to do is to thread the medium pom pom on the needle and slide it close to the large one. I sewed back through both pom poms a couple of times to make sure it was secure.

6. Cut out a circle from the black felt. I used the bottom of my tacky glue to trace it and it was the perfect size. This will be the brim of the hat.
7. Take the circle and poke the needle right in the center of it. Pull it all the way through and slide the circle down until it fits on the head of the spider. Again, at this point I sewed up and down through the pom poms and the hat brim until I felt it was secure.
8. Cut another piece of thread that's about 5 feet long and tie the end to the thread coming out of the spider as close to the hat brim as you can like in the picture. (Refer to the picture below). This way the knot won't be seen because it will be covered by the top of the hat. This string is going to be what you use to hang him from the ceiling, so if you have higher ceilings than my ~8 ft ones you'll need to cut it longer.

9. Cut a rectangle piece of felt that is about 2 1/2" across and 1 to 1 1/2" up (depends on how tall you want the hat).
10. Drizzle glue along one of the short ends.
11. Roll the felt up so the two short ends become glued together and hold it for a minute or two until it stays together. It's helpful to stick your finger inside when you're doing this.

12. Once you feel like the tube you just made is dry enough to stay together, thread it onto the 5' string that's attached to your spider. Just stick the thread right through the center of the tube - no need to use a needle.
13. Squeeze glue all around the bottom edge in a circle. Decide what side of the spider you want to be the back and make sure the seam of the tube is facing that way (gotta hide the ugly edge). Then, stick it into the middle of the circle. The string should be coming up through the top of the hat (tube).

14. Almost there! Take two googly eyes and glue them to the top pom pom on the side you want to be the front.
15. Cut a bow tie shape out of the red felt (or black if you're using another color of pom pom) and glue it right between the two pom poms. If you'd like, you can also cut a small strip and wrap it around the top hat like I've done in this picture below.

16. The top spider looks like he's doing the splits, and we can't have that! So separate those legs a little bit and then bend them all so they come straight out and then point down.
You're done! All you need to do to get this guy operating is screw a hook into the ceiling by the front door where you want him to slide down, hook his string onto it and tape the end of the string to the door. This way when you open the front door he'll greet your guests! If you want to see a visual of this click here (it's the third image on the page)
Linked up at The tasty Fork and Love Grows Wild


You'll have to do another giveaway sometime. These are so cute and I didn't realize you were doing a giveaway until it was too late!
ReplyDelete